Many of today’s faucets have a cartridge for the single handle kitchen faucet and some of those cartridges seem to cost as much as a new faucet. Add the cartridge cost to the cost of a trade professional and it is costly. If you like your faucet, I recommend replacing the cartridge. If you want a different color or style, now is the time to replace it.
Replacing the faucet cartridge
Every brand of faucet is slightly different so the following instructions may not be your exact condition. Try and determine the brand of faucet, Moen, Delta, etc. If you know the make and model of the faucet it will be much easier to find the correct replacement cartridge. If not, you will have to remove the cartridge and take it to the Home Improvement or Hardware Store to get the correct part. When you purchase the new cartridge, it will come with instructions for replacement. Read and follow them closely. The basics for replacement are typically as follows.
Turn the hot and cold shutoffs off below the sink.
At the faucet, open the hot and cold to relieve the water pressure.
Remove the handle(s) from the faucet to expose the cartridge. There will be a small set screw or slotted screw to loosen to remove the handle.
Removal of the cartridge may require a special wrench that comes with the new cartridge.
Have some rags handy to soak up water during removal.
Unscrew the cartridge retainer and set it aside.
Gently remove the old cartridge. Take note of the orientation. Replacing the new one the wrong way may have the hot and cold reversed.
Look in the opening where the cartridge was in the faucet and remove any debris. DO NOT scratch or damage the interior space where the cartridge was installed.
Tip…when installing the new cartridge, a small amount of petroleum jelly on the rubber “O” rings will make inserting easier. Not too much, as it can plug the water ports on the cartridge.
Installation is the reverse of removal.
Once the handle is installed, turn it or move it back and forth and side to side. If it is difficult to move, you tightened the cartridge retainer too tight. You will need to remove the handle and loosen the retainer.
Turn the hot and cold shutoffs back on. Slowly open the faucet handle to start the water. There will be air in the lines so expect some spurting and loud noise until the water starts to run. Be sure the cold is cold and hot is hot. If not, you reversed the cartridge. It will need removed and rotated 180 degrees. Look for any leaks around and below the handle where the new cartridge was installed.
Water Supply Lines
Water supply lines provide hot and cold water to your faucet below the sink. Your lines may be a plated copper lines or a braided lines. I recommend the braided lines, typically stainless steel braids. They will not burst as easily from water pressure increases or with age.
Tools needed:
Rags to soak up any excess water
Adjustable wrench and pliers
Faucet removal wrench (optional)
Teflon® tape
Flashlight or headlamp
If you are replacing your faucet, I recommend you replace the supply lines. It is much easier now than later when the faucet is installed. To begin, turn off the water supply to both lines. Open the faucet for both hot and cold to relieve some pressure. Place some rags below the area where the supply lines connect to the shutoffs.
Loosen the nut on the supply line where it connects to the shutoff. Be sure to support the shutoff with the pliers as you loose the nut. Do this for both lines.
Once the nuts are loose, gently remove the lines from the shutoff. Have the rags ready to collect the water. If you open the faucet handle(s) it will allow the remainder of the water to drain out of the lines.
If you are replacing your faucet. see the section on Faucet Replacement.
To remove the upper portion of the supply lines from the faucet, you need to be a contortionist. Many times getting to those lines up behind the sink below the faucet is a challenge. You will have the P traps to get around and possibly the garbage disposal. This is where the faucet wrench comes in handy. It is a long handle with a swivel head and jaws to get to the upper nut. If you have one or can borrow one I recommend it. Otherwise you have to get pliers or a small adjustable wrench on that upper nut.
Loosen the nut on the supply line where it connects to the faucet. These can be difficult to remove. Be patient and careful. Depending on the type of faucet, you may need assistance to hold on to the faucet. Do this for both lines.
Once the nuts are loose, gently remove the lines from the faucet. Have the rags ready to collect any water.
Take one of the lines to the Home Improvement or Hardware Store to get the correct length and size of lines and nuts. I recommend the braided lines. If you do not have Teflon® tape, get some at the store.
Replacing the lines is the reverse of removal. You need to place a couple of wraps of Teflon® tape around the threads on the faucet and the shutoffs. Do this before you start. When you wrap the threads, wrap in the direction you will tighten the nuts (clockwise) and be sure not to cover/plug the hole where the water flows. I say this because many times the tape is wider than the amount of threads you have to cover and the tape will wrap over the hole.
If you are using the plated copper lines and not the braided lines, you may need to cut them to length. You will also have to install the nuts and compression fittings. These can be tricky and something I chose not to describe in this section. Thus the braided line recommendation.
I frequently get asked, “How tight do I make the nuts?” My response is, “Snug.” What does that mean? Good question….I can’t answer that. Tighten to what you think is sufficient. You do not want to over tighten. When you turn the water back on you will know if they are tight enough. If you get a leak, tighten slightly and check for leaks again.
If you have a leak at one of the nuts that will not stop, turn off the water, remove the line and check the threads on the connection. If they are old and corroded you may need to replace the shutoff or faucet. Also check the inside of the nuts on the supply lines. Occasionally I have seen defective seals inside the nuts. If all looks ok, install more tape on the threads and try again.
Faucet Repair
October 4, 2014 by Rex Splitt • Plumbing • Tags: Faucet, shutoff, supply lines • 0 Comments
Faucet Repair
Many of today’s faucets have a cartridge for the single handle kitchen faucet and some of those cartridges seem to cost as much as a new faucet. Add the cartridge cost to the cost of a trade professional and it is costly. If you like your faucet, I recommend replacing the cartridge. If you want a different color or style, now is the time to replace it.
Replacing the faucet cartridge
Every brand of faucet is slightly different so the following instructions may not be your exact condition. Try and determine the brand of faucet, Moen, Delta, etc. If you know the make and model of the faucet it will be much easier to find the correct replacement cartridge. If not, you will have to remove the cartridge and take it to the Home Improvement or Hardware Store to get the correct part. When you purchase the new cartridge, it will come with instructions for replacement. Read and follow them closely. The basics for replacement are typically as follows.
Once the handle is installed, turn it or move it back and forth and side to side. If it is difficult to move, you tightened the cartridge retainer too tight. You will need to remove the handle and loosen the retainer.
Turn the hot and cold shutoffs back on. Slowly open the faucet handle to start the water. There will be air in the lines so expect some spurting and loud noise until the water starts to run. Be sure the cold is cold and hot is hot. If not, you reversed the cartridge. It will need removed and rotated 180 degrees. Look for any leaks around and below the handle where the new cartridge was installed.
Water Supply Lines
Water supply lines provide hot and cold water to your faucet below the sink. Your lines may be a plated copper lines or a braided lines. I recommend the braided lines, typically stainless steel braids. They will not burst as easily from water pressure increases or with age.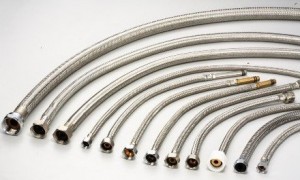
Tools needed:
If you are replacing your faucet, I recommend you replace the supply lines. It is much easier now than later when the faucet is installed. To begin, turn off the water supply to both lines. Open the faucet for both hot and cold to relieve some pressure. Place some rags below the area where the supply lines connect to the shutoffs.
To remove the upper portion of the supply lines from the faucet, you need to be a contortionist. Many times getting to those lines up behind the sink below the faucet is a challenge. You will have the P traps to get around and possibly the garbage disposal. This is where the faucet wrench comes in handy. It is a long handle with a swivel head and jaws to get to the upper nut. If you have one or can borrow one I recommend it. Otherwise you have to get pliers or a small adjustable wrench on that upper nut.
Take one of the lines to the Home Improvement or Hardware Store to get the correct length and size of lines and nuts. I recommend the braided lines. If you do not have Teflon® tape, get some at the store.
Replacing the lines is the reverse of removal. You need to place a couple of wraps of Teflon® tape around the threads on the faucet and the shutoffs. Do this before you start. When you wrap the threads, wrap in the direction you will tighten the nuts (clockwise) and be sure not to cover/plug the hole where the water flows. I say this because many times the tape is wider than the amount of threads you have to cover and the tape will wrap over the hole.
If you are using the plated copper lines and not the braided lines, you may need to cut them to length. You will also have to install the nuts and compression fittings. These can be tricky and something I chose not to describe in this section. Thus the braided line recommendation.
I frequently get asked, “How tight do I make the nuts?” My response is, “Snug.” What does that mean? Good question….I can’t answer that. Tighten to what you think is sufficient. You do not want to over tighten. When you turn the water back on you will know if they are tight enough. If you get a leak, tighten slightly and check for leaks again.
If you have a leak at one of the nuts that will not stop, turn off the water, remove the line and check the threads on the connection. If they are old and corroded you may need to replace the shutoff or faucet. Also check the inside of the nuts on the supply lines. Occasionally I have seen defective seals inside the nuts. If all looks ok, install more tape on the threads and try again.